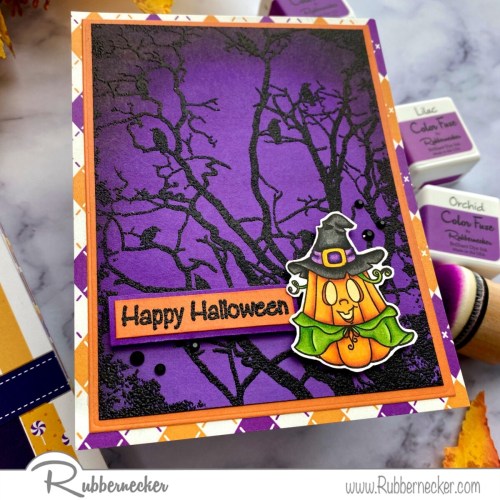
Combine a trick and a treat with this easy to make semi-spooky Halloween card!
Today Carol caught the Spook-tacular Paper Pad bug, too and has made for us a really cute, only semi-spooky Halloween card that features a handful of all new goodies from our store. Let’s take a peek at how to put this together!
Start by choosing a patterned paper from our new Spook-tacular Paper Pad and trim 4 ½” x 5 ½”. Keep the scrap strips to use on other projects! PRO TIP: As this card is ideal for batch making, pick a few patterned papers and make more than one of these cards at a time to have handy.
Now choose a coordinating solid color from the Paper Pad and trim that to 4″ x 5 ¼”. And last, choose another solid color and trim that to 3 ¾” x 5″. As you can see, Carol chose the orange and purple argyle for her card front, orange for her border layer and purple for her semi-spooky background. PRO TIP: If you want to preserve more of the layer piece, use your paper trimmer or craft knife to cut out the center.
PRO TIP 2: Because we chose to use nice, heavy card stock weight paper for our Rubbernecker Paper Pads, the edges of these papers don’t stay adhered to the tear-off backing as well as thinner papers do. Our tip to deal with the papers that come loose is to either store them in a baggie or use a binder clip to hold them together. It’s a manufacturing trade off and we figured you’d rather have better paper!
Adhere the patterned paper to a card stock card front and then adhere your border layer over that.
Take your background piece and choose three coordinating Color Fuse shades. Because Carol was using that great purple, she chose the three darkest colors from Color Fuse Set #6. Use a blending tool to add a lovely ombre look to the background.
When you are done inking, apply your anti-static tool to the surface and stamp our new Framed Crows in Trees background stamp with VersaMark ink. Heat emboss with black glitter embossing powder – plain black looks excellent, too!
PRO TIP: Because the paper in our pads is super smooth, when you heat emboss you will want to treat it like you do vellum. Let the heat tool warm up first and then set the heat embossing powder by moving the tool constantly. If it starts to warp, shift to heating from below and then from above and repeat switching to keep the paper as flat as possible. If it does warp, don’t worry! Just sandwich your heat embossed piece between pieces of printer paper and zip them through your die cutting machine!
Doesn’t that look AMAZING? For some extra dimension and to add a teeny bit more drama, blend some black ink around the edges.
Adhere your now semi-spooky background to your card assembly.
Now stamp your image(s) from our Pumpkin Dress Up set and color in with your favorite medium. Cut it/them out with our coordinating die.
Remember we said to save those scraps? Take a strip from trimming her orange layer piece and stamp and heat emboss your sentiment onto it using the same black powder. Then layer it over a scrap strip of the purple for your greeting.
Add your little character and your sentiment using some dimensional adhesive and pop on a few black gems for some shine and you’re done! SO adorable, right?
Here’s what you will want to have to make this card and all the variations you can think of using this not-quite-scary design:

What a cute idea for a semi-spooky Halloween card! And if you’ve had a chance to browse the designs in the Spook-tacular Paper Pad you know there are plenty in there to choose from. Making a whole stack of these cards, one with each of the five adorable gourds in the Pumpkin Dress Up set AND the different designs of the paper, will be a fun and easy way to treat your friends to some Halloween delight!


