

Rubbernecker Stamps has rebranded and is now Brass & Bliss Craft Co. The items in this blog post can be found on our new website at www.BrassandBliss.com. The shopping links in this blog have been updated to take you to the correct location for purchase.
There are lots of ways to make card backgrounds – check out this simple fun way!
There are loads of background techniques for card making ranging from the unadorned to the fabulously complicated. This one, from Jamie, is definitely on the easier side but sacrifices no details nor pretty impact. Let’s take a look at what she’s made for us.
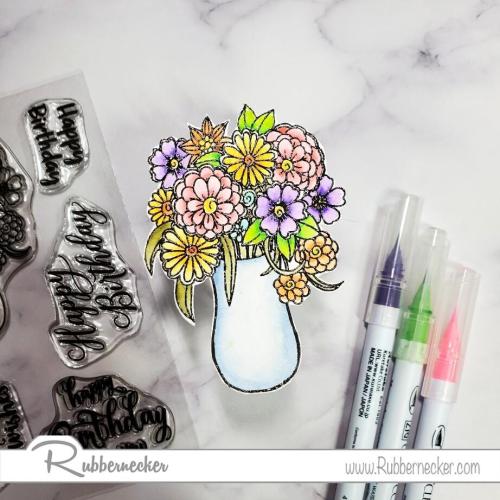
Jamie started by stamping the vase of flowers from our new Birthday Vase stamp set with black Versafine ink onto watercolor paper and heat embossed it with clear powder. PRO TIP: Whenever you are going to use a “juicy” medium – like watercolors or watercolor markers – embossing with clear powder over your choice of colored ink for the outline helps to contain the liquid and prevents bleeding or blending you don’t want. Jamie colored the image with her Clean Color Real Brush Pens, cut it out and set it aside.
Now she started her pretty background. Jamie knew she wanted to leave a lot of white space to let her pretty vase of flowers really stand out so she started by using a blender brush to apply some Rose Color Fuse Ink from Set #5 to the center/right side area of a card layer sized panel of white card stock. She then stamped over this blended area in the same color ink with her choice of one of our script stamps.
Now, for just a hint of visual movement and some dimension, Jamie stamped some of the small ink splatters from our Watercolor Splatter set using Silver Color Fuse Ink from Set #12. She then added a strip of black and white diagonal striped washi tape to the left side and set this aside with her vase.

Now she stamped a pink card base with our Graduated Horizontal Stripe Background Stamp using Versamark and then heat embossed it with a sparkly pink embossing powder.

She also stamped one of the sentiments from the Birthday Vase set onto a scrap of the same pink card stock as the card with the same black Versafine ink and heat embossed that with clear embossing powder. She trimmed that into a nice rectangle.
Now she assembled her card. She adhered her white background panel to the pink card with tape runner, added the greeting and her beautiful vase of flowers with dimensional adhesive and then added just a few iridescent sequins to add just a touch of soft bling. As a final touch, Jamie created a multi-loop bow from some soft pink twine and adhered it to the vase.
So pretty!

We love learning new background techniques for card making of all sorts and sometimes it’s just in the combination of a few things on a small scale that make something really pretty. Try letting your creative self go the next time you want to create something a little different and see if you don’t just surprise yourself!