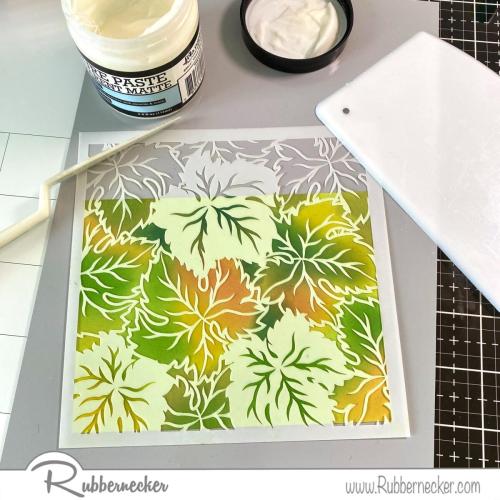
When you learn how to make this style of transparent texture paste background with one of our stencils, you will be positively hooked!
There are plenty of ways to make a transparent texture paste background for cards and we think this one from Carol has to be possibly the most beautiful we’ve seen! Using one of our beautifully detailed stencils – here our Fall Leaf Stencil – to first apply ink and then transparent texture past builds a look that is irresistible. Let’s get into how she did this so we can get into making one of our own!
Carol started by spraying the back of our Fall Leaf stencil with some Pixie Spray. Carol says “This is a very intricate stencil and the spray makes the little detailed parts adhere to the card stock.” Carol laid this over a card sized piece of apple green card stock instead of white for an effect you will see in a moment.
Using her favorite in blending tool, Carol them applied a variety of distress oxide inks in fall colors through the stencil. Carol chose distress oxide because of the level of opacity the ink offers which allows that vibrant green to stand out and pop against the inks. NOTE: The colors Carol used are Mowed Lawn, Rustic Wilderness, Peeled Paint, Mustard Seed, Wild Honey and Spiced Marmalade.
Carol removed the stencil and gently cleaned off the ink. She then realigned the stencil over her colored panel.
Using a pallet knife, she then spread some transparent texture paste through the stencil, smoothing to make the paste application even over the surface of stencil. NOTE: The paste Carol used dries clear and has a matte finish; you can choose one you particularly love and your final project will be just as stunning.
Carol peeled off the the stencil and immediately cleaned that and her application tool. PRO TIP: Carol says “I get a wide shallow bowl and fill it with water and a few drops of dish soap. I put this right near my craft mat to be able to just drop the stencil and tools into it to soak.
After setting the stenciled piece aside to dry, Carol created her beautiful sunflower with our Like a Sunflower layered stamp set. She took the first layer of the stamp – the base petal layer and the flower center – and inked up just the flower petals with Citrus Color Fuse ink from Set #2. PRO TIP: It’s OK if you get a little yellow on the center; you will be overstamping in a darker color. Carol did use her stamp positioner which will be helpful for the stamping of the last petal layer.
To create the center, Carol then used a sponge dauber to add Caramel and Cinnamon Color Fuse Ink from Set #3. Again, if you get some brown at the base of the petals, that’s okay! It will just add more depth to the flower.
Carol then stamped layer two with Apricot Color Fuse Ink, also from Set #2, using the layering guide to double check her layers and alignment.
Using Pecan Color Fuse Ink, also fro, Set #3, Carol stamped the outline of the petals several times to deepen the color. Leaving everything in place, Carol cleaned the stamp and then stamped the outline layer a last time with VersaMark.
She then heat embossed this with clear powder to add extra dimension and to echo the dimension created by that transparent texture paste on the background. Carol then fussy cut this beautiful blossom, leaving a narrow white border.
Now she was ready to assemble! She trimmed her transparent texture paste background to 4″ X 5 ¼” to allow a slim border of white from her card base. Before adhering it, though, Carol used an ink blender brush and applied some Grass Color Fuse Ink from Set #11 just around the edges of the stenciled panel.
Carol stamped her choice of one of the five included in our Like a Sunflower set with black ink onto a scrap of white card stock and trimmed it to a rectangle. Now she just popped that and her gorgeous flower over her dazzling background and this spectacular project was done!
Here are the items from our store that Carol used today:

When we saw this card, we immediately checked out our collection of stencils to see which other ones would lend themselves to this style of transparent texture past background making. And guess what? We think ALL of them would be gorgeous! What about you – which one of our stencils would you use to try this out?


