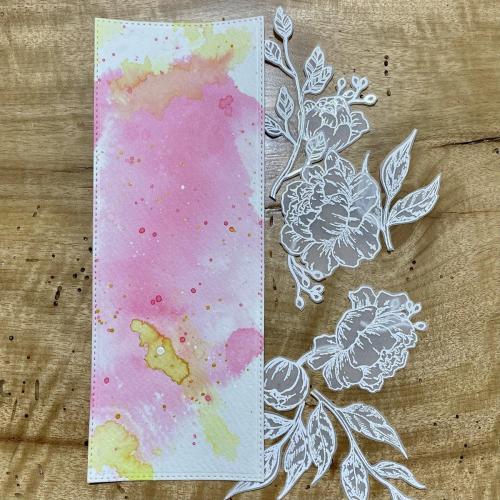
Can you believe this gorgeous detail is created simply by heat embossing on vellum?
We can’t get over how absolutely gorgeous this heat embossing on vellum is with the beautiful, ethereal details created with the white on white look. Melinda has outdone herself with this stunning card and today we are going to see how she did it!
First, Melinda made her beautiful watercolor background. She started with a piece of watercolor paper that she cut with our largest Slimline Nested Stitch Die. She placed a few drops of fuchsia liquid watercolor onto a craft mat and tapped the die cut panel onto the liquid. Then she repeated this process with chartreuse, doing as much as she could to keep the colors separated so they didn’t mix and turn brown. As Melinda says “A little is OK!” She set this aside to dry thoroughly.
Once it was dry, Melinda added some fabulous texture by spattering the surface with some white acrylic paint and more fuchsia and chartreuse watercolor and again let it all dry completely.
Now for the magic of heat embossing on vellum! Of course, as always, Melinda brushed over her piece of vellum with her anti-static tool and stamped the images from our Poetic Peonies in Versmark ink. PRO TIP: When working with Versamark, it can be helpful to use a stamp positioner so you can stamp all your images at once so the ink stays nice and juicy.
Melinda then heat embossed her stamped images with white embossing powder. PRO TIP: When heat embossing on vellum, heat up your tool first and keep it moving over the surface to prevent warping. If your vellum does start to warp, heat from the other side for a bit. This will still melt the powder and can help to keep your vellum flat.
For pops of white highlights to accentuate this beautiful white on white look, Melinda cut some white card stock scraps with our Branches and Leaves die and cut “Love” four times. She adhered the words together with liquid glue in a stack and buffed a little Sonata Color Fuse over the top half of the letters. She also stamped “You” from our Thanks set and trimmed it into a tiny rectangle. PRO TIP: Don’t be afraid to cut your stamps apart! Melinda likes to use the word “you” a lot and likes this font so she trimmed it apart from the other words. You can always line things up again with your stamp positioner!
Now Melinda started to put her card together. She added her inked background to a slimline card base using some dimensional adhesive. Then she arranged her white on white heat embossed vellum elements in a cascade down the card and when she had it just so, she added them with liquid glue, cleverly added in the areas that had heavy coverage from the embossing to hide the adhesive. At the same time she tucked in her “highlights” – the foliage she cut from the white card stock – into her arrangement. All that was left was to add her “Love” with more liquid adhesive and her “You” with some foam tape.
Isn’t it just so beautiful?
Here are the things Melinda used today to make this absolutely gorgeous card:

Heat embossing on vellum isn’t necessarily a new thing but done in white on white with that spectacular watercolor inked background really makes it look divine! Give it a try and see if you aren’t as wow’d as we are!


