

You just have to come see how easy it is to make this fabulous die cut fall foliage wreath card!
Rubbernecker Stamps has rebranded and is now Brass & Bliss Craft Co. The items in this blog post can be found on our new website at www.BrassandBliss.com. The shopping links in this blog have been updated to take you to the correct location for purchasing.
Today Ricky is sharing his design for an amazing die cut fall foliage wreath card that is so gorgeous and so loaded with texture. He’s turned his into a birthday card but this is such a showstopper that you could put almost any sentiment on it and it would be ideal.
Ricky has used the technique of layering multiples of the same die cut from all different complementary card stocks. This is such an excellent way to use up those orphan pieces of card stock. Just grab a stack and mix and match, throwing in some metallics and/or textured pieces for some added interest.
Let’s get Ricky’s own telling of how he put this together and then we can come back and chat.
Gather some very fall like card stock that you have in your stash. I used some scraps I had. Also, grab a piece of cream colored card stock as well. Using Mocha Color Fuse Ink from Set #3, stamp Cheesecloth Background onto the cream card stock and set aside for your sentiment.

With the Open Greenery #1 die, cut out two of each from each color card stock you have gathered. I had about 6 to 7 different colors which gave me a group of 12-14 die cuts.

Use the Nested Circle Dies and cut a round frame to create a base for your wreath. Using liquid adhesive place each sprig onto the frame, overlapping slightly and slightly angled outward, to start your wreath.

Keep adding your die cuts, mixing up the colors in layers until you’ve adhered them all down. PRO TIP: Concentrate on adhering these at the stem end to give that extra texture and to make it easy to layer.
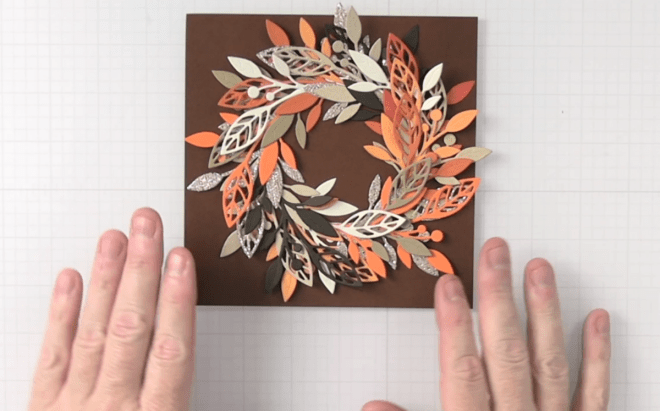
Choose a piece of paper as your card background – I chose a piece of solid brown from the awesome Java Good Time 6 X 6 Paper Pad. Gently flip your wreath over and add foam tape adhesive to the back of your frame.

I chose to make my card a full 6 X 6 to show off all that glorious die cut foliage. If you have 12″ X 12″ paper, making the card base will be easy. If you don’t, here’s a great PRO TIP: Take two pieces of 8 1/2″ x 11″ card stock and cut one piece to 6″ x 6″ piece out and the other to 6″ x 6 1/2″. On the 6 1/2″ piece, score a line at 6 inches and fold over. To create the base, place some liquid glue on the half inch tab and then place the 6″ x 6″ paper on the tab, using the liquid glue’s offer of some wiggle time to get it perfectly lined up. Voila!
Adhere the patterned paper to your card base and then peel off the foam tape backing on your die cut foliage wreath and add it to the card.
For the sentiment, stamp the Happy Birthday from the Happy Birthday set in Pecan Color Fuse Ink, also from Set #3 into your cheesecloth stamped piece. SAVE the extra! Fussy cut around the words leaving a narrow border and then pop it into the center of the wreath with some layered adhesive foam tape.
It’s Rubbernecker back – isn’t this GORGEOUS??? And even though Ricky gave us such great step by step instructions, he’s made us a fun video showing this project coming to life. Check it out!
All that delicious texture and detail….. and all made in such a clever way with a single die! Here’s what you will want to grab to make this card at home:
- 3031 Happy Birthday #1 – 4×6 Stamp Set
- Color Fuse Set #3
- 5611-04D Open Greenery #1 Die
- 2020 Java Good Time- 6×6 Paper Pad
- 5002D Classic Nested Circle Dies
- 3487-07 Cheesecloth Background – 4.25×5.5 Stamp


We can see that no matter what colors you use or how you combine them this die cut fall foliage wreath card will always turn out spectacular. Are you now rushing to your scrap stash to see what you have? We thought so because we are doing the same thing!