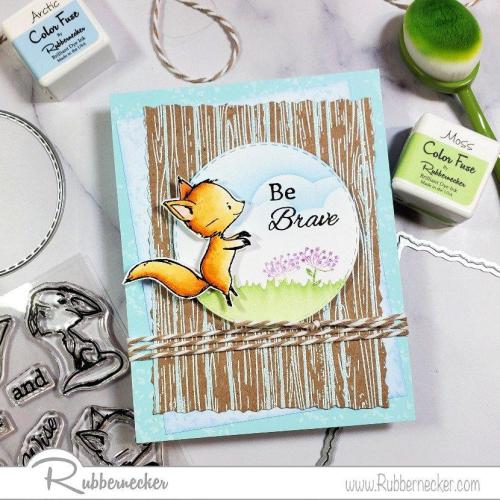
We don’t see a lot of encouragement card ideas and this one is perfect for just about anyone!
Encouragement card ideas are few and far between out there but we know that we send a lot of messages of courage, strength and determination and when we saw this project from Jamie, well, this is one to save! Jamie says “When I saw this new stamp set and that I could make a card that said ‘Be Brave’, I thought that it would make a wonderful card for someone who is going through a tough or scary time such as medical problems, moving, any number of things.” Ohmygosh, we SO agree! It’s sweet enough for a child but is also perfect for any aged person thanks to its graphic elements and strong lines.
Shall we make one?
First, use our Nested Circle Small Stitch Die set and our Slimline Grass die to cut some white card stock. Use Clover, Mist and Moss Color Fuse Ink with a blending brush to add some color to a few inches of the the grass strip.

Use the same circle die you used before and cut that colored section of the strip.

Take your white die cut circle and using your stencil that you made after seeing this post, add some clouds to the circle using Arctic Color Fuse Ink. Add some flowers with Moss and Lavender Color Fuse and then add your little grass element to the bottom. Isn’t the way it fits so perfectly just adorable? Stamp Your Be and Brave in black right over the clouds.
Now stamp a piece of kraft card stock with our Wood Grain Fence stamp and Versmark and heat emboss with a pale blue embossing powder to coordinate with your card base (or, of course, whatever color you choose!). Die cut that panel with one of our Nested Deckle Rectangles Dies.

For some added motion and fun, Jamie used one of the flower stamps to add some little speckles to her white layer and her card base. She stamped Arctic Color Fuse around the edges of the white layer and white pigment ink to stamp around the edges on her pale blue card base. This method of “echoing” on your projects keeps the eye moving around and adds a lot of impact!
Once the card base is completely dry – you can speed it up with your heat tool – add the white layer at a bit of an angle and then the wood grain layer over that at an opposite angle. This adds even more “motion”! Now you can add your detailed circle to the front with some foam tape.
Make your little foxy friend by stamping him/her on white card stock to color. Jamie used watercolor brush pens so she chose to stamp with VersaFine black ink and heat embossed with clear powder. When you’ve got that little cutie all colored up, cut them out with our coordinating dies and add them over the circle with more dimensional adhesive for even more depth.

Jamie made her card top folding so she wrapped a little brown and white baker’s twine around the layers; if your card is side opening, you can do this before you add the white and wood grain layers to your card base. For just a touch of sparkle, Jamie added some Mermaid Tail Stickles to her flowers and this card was ready to give someone a BOOST!
We’ve had so many lovely comments on this stamp set and are very happy that you are loving all the combinations you can make with the words. And yes, the foxes are ADORABLE. Here are the goodies Jamie used to make this card:


We know we are saving this to our encouragement card ideas section and hope it inspires you to make a special card to send to someone who needs to know that you are in their corner!

