If you love our layered flower stamps you are going to FLIP for our new flower stencils for card making!
We’ve become known for our beautiful layered floral stamps with additional details you won’t see with other stamp sets. Because those have become so popular and because we know some of you love to experiment with the coloring of these beautiful images, we’ve created some new layered flower stencils for card making.
These four new stencil sets are designed to give you endless creative opportunities to color the coordinating stamp sets designed to work perfectly together. You can apply single colors through them, use ombre inking to create dimension, even apply different media through the stencils for all kinds of new effects.
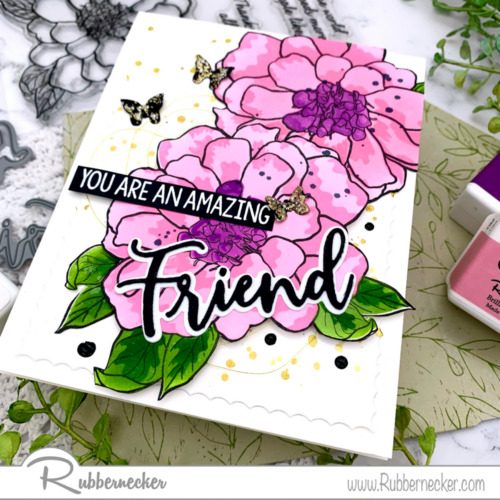
Today Natasha has created this card for us using simple inking with our Color Fuse Ink to create that beautiful, clear pure color and then added some fun details to bring the whole project together. Let’s make one along with her!
Natasha started with the stencil for our new Above and Beyond Stencil set and blended Rose Color Fuse Ink from Set #5 onto white card stock. She continued with each additional stencil building her layers of details with Blush Color Fuse Ink and then Orchid and Magenta from Set #6. She then created her leaves using Basil and Clover Color Fuse Ink from Set #10.
She repeated this process with a second blossom.
When she was all done adding all these delicious layers of color, Natasha stamped the outline with black ink over each flower. After cutting out her large beautiful blooms, She used a black marker and ran it sideways around her cut outs to create a cohesive edge.
Next, Natasha used some gold metallic watercolor and splattered it over a piece of white card stock. When that was completely dry, she cut it out with one of the dies from our Inside Scallop Nested set. She adhered this to a white card base.
Now she used our Friend Script with Shadow die to cut the shadow portion once from a scrap of white card stock and the script portion three times from scraps of black card stock. She adhered the black word die cuts together with liquid glue to make a dimensional element and then adhered that to the shadow.
For her pretty “gilded” butterflies, Natasha used our Small Butterflies die to cut some scraps of black card stock, patted them with some Versamark ink and heat embossed them with gold glitter powder.
For her sentiment, Natasha stamped her phrase from our Sweet Surprises set onto a scrap strip of black card stock and heat embossed it with white powder, trimming it to a close rectangle.
To put this stunner together, Natasha arranged her flowers on her spattered background with her tape runner and dimensional adhesive, adding some loops of gold metallic thread behind them. She added her butterflies, sentiment and word die cut with a mix of thicknesses of dimensional adhesive and, as a finishing touch, added a few black Nuvo drops and splatters over her stenciled flowers for continuity of detail from her background.
This is just so pretty with those gorgeous crystal clear layers of color! And the dimension from the layered details with the additional depth from the assembly gives the eye a ton to admire!
Here’s what you will want to grab up from the store to make this card at home:

We hope you give our new flower stencils for card making a try and see how many beautiful color combinations you can come up with! They are so pretty and absolutely a ton of fun to use!


