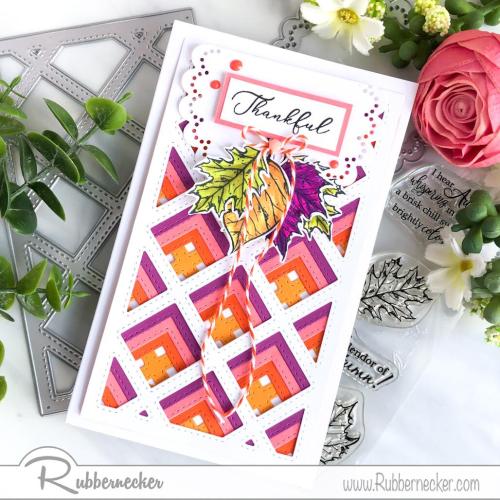
You are going to RUN to your craft spot to make this offset layered die cut background!
We are in AWE of the effect that this offset layered die cut background has on this project and our brains are popping with ideas for how to use this fun trick with other dies. Aren’t you just bedazzled by all those gorgeous angles? The depth and richness of this textured look is fantastic! And when you see how easy this is – well, we want to caution you to make sure you feed and walk your pets, start dinner and get a fresh water before you start because you will NOT want to STOP!
We are SO glad Allison was inspired to experiment with this ONE die to make this amazing look and of course she’s sharing her how tos with us. Ready?
Start by using our Mini Slimline Cover #3 to cut three different colored card stock pieces plus one white piece.
Take two pieces of the colored card stock and adhere them together slightly offset to reveal the start of that gorgeous pattern. PRO TIP: Liquid glue is ideal for this project because it will give you time to get everything moved around for perfect alignment.
Add a third colored die cut to the assembly using the same process.
Next layer the white over the top using the same sliding alignment process. Trim off any overhang.
Now take that last piece of colored card stock and position it on the back/bottom, adhering it so that each little window has a colored “X” in the center. Trim any overhang.
Try not to fall off your chair while you stamp, color and die cut some leaves from our Splatter Leaves set.
Use the middle circle on our Nested Circle Scallop With Holes die set to cut a piece of white card stock and use dimensional adhesive to layer it over the top of the offset die cut panel where the three edges of the layers show; trim off the excess.
Stamp your sentiment onto a scrap of white card stock, trim closely and then layer over a scrap of one of the colors you used to cut your die cut layers. Adhere this assembly to the top of your die cut doily with dimensional adhesive.
Adhere the leaves below the sentiment and add a baker’s twine bow with extra long tails. Pop your offset layers onto a card base and finish off your card with some Nuvo drops.
Here’s what Allie used to make this glorious project:

We can’t believe how easy making this offset layered die cut background is AND how absolutely gorgeous it turns out!


