

Learn how to use the press n seal die cut technique for super easy paper piecing!
Rubbernecker Stamps has rebranded and is now Brass & Bliss Craft Co. The items in this blog post can be found on our new website at www.BrassandBliss.com. The shopping links in this blog have been updated to take you to the correct location for purchase.
Today we have this absolutely GORGEOUS birthday card in purple – one of Sammi’s favorite colors – and not only does she show us how she created those beautiful stenciled flowers, she shows us how to use the press n seal die cut technique to get them all on her card in one clever step!
We love using our floral dies to make beautiful arrangements and sometimes you get these laid out just perfectly in your rest run but then when you go to adhere everything in place…..well…..things shift. And sometimes it’s just fine and sometimes it bugs the pants off of us. This easy way to affix everything together before you adhere it to your card is genius and the way Sammi showed this off today is so good we thought it was worth a reminder.
Let’s get into the making!
Sammi started by stamping the floral image from our New Friends Floral stamp set in black onto white card stock. She then used our New Friends Stencil Set to ink blend these pretty posies in with Color Fuse Inks.
She started with purples from Set #6 and reds from Set #4:

She then created her centers with sunny yellows from Set #1, bringing the red from her petals into the centers to create that beautiful shading:

And then, in a fantastic PRO TIP, Sammi used Hearth ink from Set #12 to add some deep shading. Sammi says “I found that adding some gray adds that depth that I am looking for.” What a GREAT tip!

Before cutting out her pretty bouquet with our coordinating die, she colored in her leaves with the greens from Set #11:

Sammi then cut out several foliage elements using our Branches and Leaves die and colored them, too, with the same greens from Color Fuse Set #11:

Next, Sammi took a piece of purple card stock and using Magenta Color Fuse ink from Set #6, stamped it with our Horizontal Stripe Background and then cut the bottom with one of the shapes in our Borders #2 die set. She then cut a piece of white cards stock with the same border die, trimmed them to fit her card front and then adhered them together offset to give a nice wide white edge.

Now for that time and fret saving press n seal die cut technique! Sammi arranged her die cut floral element and added her branches and leaves die cuts around it, tucking them in and overlapping them to create the look she wanted. When she had it just right, she took a piece of Press N Seal and pressed it down over her die cut arrangement, using her fingertips to press over the entirety of all the pieces so they became (temporarily) one with the wrap.

She flipped this over as one piece and added foam tape to the back, spanning the pieces to reinforce turning it into a single element. When she’d added her adhesive, she flipped the now one element over and added some white splatters with white ink.
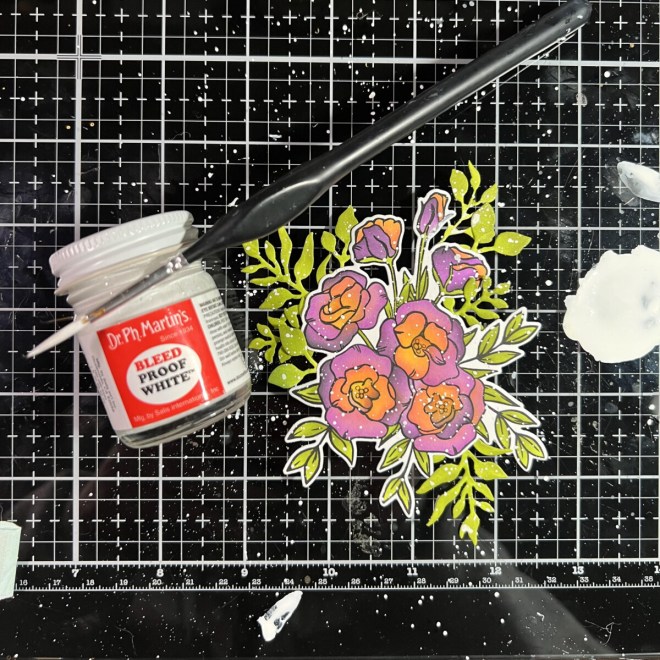
She adhered her beautiful bouquet to the front of her card, allowing some of the foliage to hang down to create that visual movement. Sammi stamped one of the sentiments from our Happy Birthday set aligned with the white border and then popped the whole thing onto her card base. As a final touch she added some dark purple pearly embellishments and, no doubt, spent a few minutes admiring her beautiful card!

Here are the goodies from our store that Sammi used today:
- 5404D Branches and Leaves Die
- 5160-02D Borders #2 Die
- 3496-06 New Friends Floral – 4×6 Stamp Set
- 3496-06D New Friends Floral Coordinating Die
- 3496-06S New Friends Floral Coordinating Stencil
- 3031 Happy Birthday #1 – 4×6 Stamp Set
- Color Fuse Set #4
- Color Fuse Set #11
- Color Fuse Set #12
- Color Fuse Set #6
- Color Fuse Set #1
Remember, now through next Tuesday, all birthday items –
INCLUDING items from the brand new release – are 15% off!
Come fill your baskets with all the fun birthday things we have
and get your crafting on for less!

If you hadn’t seen this clever press n seal die cut technique before now you have and let us tell you, it is a game changer! It’s the best thing EVER for die cut words, letters, floral arrangements like this, layered designs, etc. And the fact that we got to see it demonstrated on such a beautiful handmade birthday card is sprinkles on the icing!
Beautiful card! I love the colors and the angled bottom edge.
We agree – she did a beautiful job on this card!