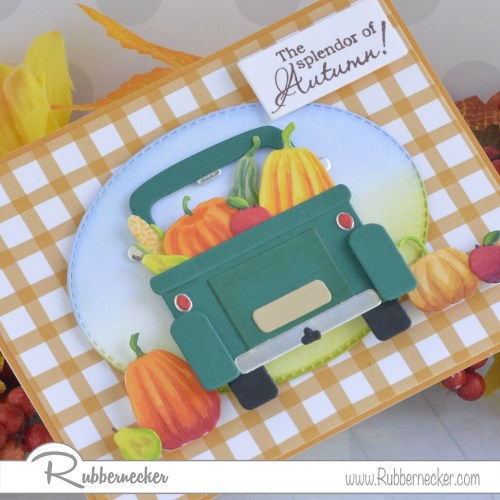
We are in LOVE with this sweet handmade Fall card with all its precious details and just beautifully colored Fall veggies!
Today Annie has combined something older – seasonal dies – and something newer – our Harvest Time Paper Pad – and is sharing this sweet handmade Fall card. Using the tractors she sees pulling cartloads of pumpkins in her area, Annie recreated that iconic Fall vibe in paper. Let’s learn how she did it so we can make some, too!
Annie started by using our Old Truck Back Die Set to cut scraps of green, black, red and silver card stock and assembled all the fun, detailed parts and pieces. PRO TIP: Assemble the back and roof sections separately so you can fill the truck bed with your harvest of die cuts.
Annie then created her autumn bounty of farm grown goodies by cutting pieces of white card stock using our Pumpkins & Ivy and Apple, Pears & Corn die sets. She colored each of these with her Copic markers, using bright colors for pop and lots of shading, making each piece look as if it were exquisitely hand painted.
Then she trimmed a sheet of the patterned paper from our Harvest Time Rubbernecker Paper Pad to 4″ X 5¼ ” and a sheet of coordinating solid colored paper to 4¼ ” X 5½ “, adhering them together and then adding them to her card base with her tape runner.
She then cut a piece of white card stock using a die from our Nested Oval Small Stitch die set and blended Sky Color Fuse Ink from Set #7 to the top half and Juniper Color Fuse Ink from Set #11 to the bottom to create a little landscape background. She also stamped her greeting from our Splatter Leaves stamp set onto a scrap of white card stock and trimmed it to a close rectangle.
Now, to assemble her card, Annie added her inked oval to the center of the card with some dimensional adhesive and then the roof section of the truck with more foam tape. She then added her pile of goodies a variety of thicknesses of adhesive to create a very dimensional look. When she had her harvest loaded, she added the back of the truck with layered dimensional adhesive for even more depth. PRO TIP: When creating highly dimensional elements like this one, apply some liquid glue on top of the sticky surface of your dimensional adhesive so you can maneuver the pieces around a bit.
Annie added a few extra veggies around the base of the truck, popped her sentiment on with some foam tape and probably spent several minutes admiring her work! (We know WE would!)
Here are the items from the store Annie used today – pull them out of your stash or add to your cart to make this card at home:

There are lots of different patterns in the Harvest Time Rubbernecker Paper Pad that will look just perfect with this sweet handmade Fall card so if you have it already, flip through and pull out the ones you want to use. And if you don’t have it yet, grab your own because we have lots of cute ideas coming that use these fabulous patterns!


