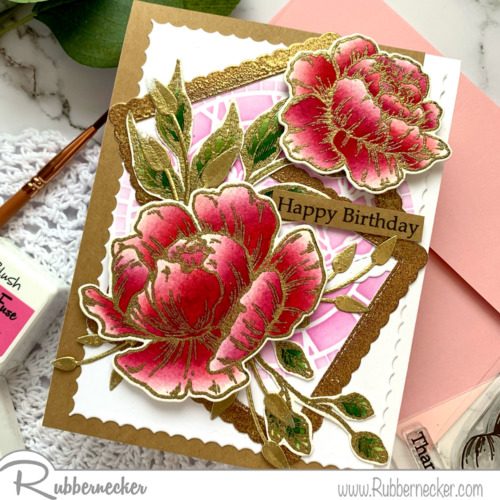
Just look at what gold heat embossing does for these watercolor flower stamps!
Today we are blown away by how pretty this card that Natasha made for us turned out – the gold embossing sets off these watercolor flower stamps so perfectly and her layering adds an even richer effect to this project! Let’s just get right to it – we can’t wait!
Natasha began by stamping her images from our Poetic Peonies stamp set onto watercolor paper with Versamark and heat embossed them with gold powder. She then watercolored these images, allowing each application to dry thoroughly before adding more colors. This prevents the watercolors from blending completely and lets you build your shading and coloring as you go. PRO TIP: Natasha tapes down all sides of watercolor paper to help prevent any warping that might occur when using watercolors.
Once completely dry, Natasha cut these images with our coordinating dies and fussy cut the leaves.
To make her gold frames that appear in the background, Natasha cut four pieces of white card stock using our Square Combo #1 OPC die and adhered them together in pairs with liquid glue. She coated the surfaces of these with Versamark and covered them with gold embossing powder, heating and repeating the process until she had thorough coverage. She set these aside.
While she still had her heat tool out, she also used our Small Leaf Group die to cut a few scraps of vellum card stock and, repeating the technique above, covered the die cuts with Versamark and heat embossed with the gold powder.
Now Natasha used our Clock Stencil to blend the Color Fuse Inks from Set #5, starting with the lightest, adding areas in the darker colors for shading and dimension. She then die cut that stenciled panel with one of the dies from our Nested Inside Scallop set.
It was time to put the card together! Natasha adhered a layer of kraft card stock to her card, aligning it with the fold side and leaving some of the card front uncovered. She then adhered her stenciled panel to the card front. Now, she took her two gold frames and arranged them at angles and adhered them with liquid glue. She then arranged her gorgeous elements made with her watercolor flower stamps and adhered them with dimensional adhesive for lots of pop! She tucked a few of her gold leaf embellishements into the arrangement using liquid glue. All that was left was to choose a greeting, stamp it onto a scrap of kraft card stock, trim it down and pop it onto the card. PRO TIP: Leave your sentiments OFF of some of your cards so you can pick and choose greetings later to suit the occasion you need the card for.
We just LOVE that soft watercolor look with the patina of that gold heat embossing! Here are the items you will want to snap up to reproduce this card at home:

We have to do a little humble brag here – we are known for our watercolor flower stamps. We spend a lot of time designing them so they can give you the absolute biggest bang for your hard earned bucks! So when we see a beautiful twist on them, like this stunning project and this one here, we get super excited to share. We hope this has given you some big inspiration!


